

When you’re buying an investment property, inspections are one of your best tools for protecting yourself.
They help you find hidden issues and give you leverage to negotiate with the seller.
Knowing how to navigate the inspection process can save you money and help you avoid costly surprises later.
Secrets of Inspections

In this module (31 of 46 in the Real Estate Investing Secrets course), you will learn:
Table of Contents
Included below:
The Inspection Process
What Level of Inspecting Are You Doing Prior to Going Under Contract?
Dates are Important
Your Right to Inspect per the Contract
What Can You Inspect?
Inclusions
Services to the Property
Proposed or Existing Transportation Projects
Other Activity, Odor, or Noise
Your Options
You Can Terminate
You Can Object
You Can Resolve Your Objection
Parties Involved
Inspection Objection Notice
Negotiating Philosophies for Inspections
Objecting Tips
Common Objections
Inspection Resolution
Best Practices
Terminating
Earnest Money Release
Negotiating Tips
The Inspection Process
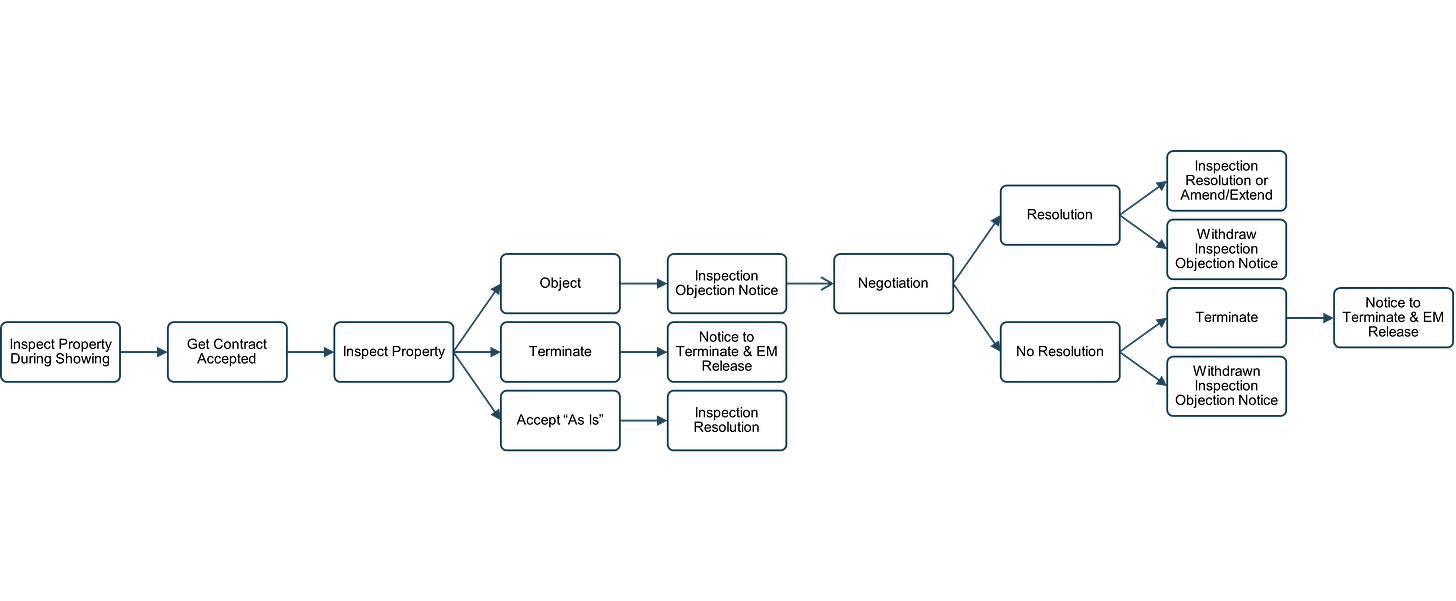
In this section, we’ll guide you through the inspection process, from your initial showing to final negotiations.
This process ensures the property is in the condition you expected when you made your offer and that you’ve completed your due diligence before finalizing the purchase.
Inspect Property During Showing
This is your first chance to look at the property in detail. While you're not hiring a professional inspector yet, you should keep an eye out for any obvious issues that could impact if you write an offer and what you offer based on what you can see.
Get Contract Accepted
Once your offer is accepted, the formal inspection period begins. This is when you’ll hire a professional inspector to thoroughly evaluate the property for any non-obvious problems that you could not see during showing.
Inspect Property
During this step, the inspector will check critical areas like the structure, electrical systems, plumbing, and HVAC. Afterward, you’ll receive a report that details any issues they found.
After the inspection, you have several options based on the findings:
Object, Terminate, or Accept "As Is"
Object – If significant problems are found, you can request repairs or concessions from the seller.
Terminate – If the issues are too serious, you can terminate the contract and get your earnest money back.
Accept "As Is" – If the issues are minor or manageable, you may choose to accept the property without asking for changes.
Inspection Objection Notice
If you choose to object, you'll file this notice, formally requesting the seller to make repairs or provide a financial concession.
Notice to Terminate & Earnest Money Release
If you decide to terminate the contract, this step finalizes your withdrawal from the deal and ensures your earnest money is returned.
Inspection Resolution
If you objected, this document outlines the agreement between you and the seller, detailing what repairs will be made or what concessions will be given.
Negotiation
Once an objection is filed, you and the seller negotiate. They may agree to repairs, offer a discount, or refuse to fix anything.
Resolution or No Resolution
Resolution – You and the seller reach an agreement, and the deal moves forward.
No Resolution – If you can't agree, you can either terminate the contract or withdraw your objection and accept the property as-is.
Withdraw Inspection Objection Notice
If you reach a resolution, you can withdraw your objection, confirming you're satisfied with the negotiated outcome.
Terminate or Withdraw
If no resolution is reached, you can either terminate the deal or proceed with the purchase as-is by withdrawing the objection.
It's important to note that your local real estate contract and customs may differ from what's described here. Your real estate agent can help you understand how your local inspection process may vary—if at all—from this general overview.
Always consult with your agent and review your specific contract to ensure you're following the correct procedures for your area. Your real estate contract and forms will explain and dictate exactly how this works for you; you should read those.
What Level of Inspecting Are You Doing Prior to Going Under Contract?
Before you go under contract, you’re doing a more general, informal inspection of the property. You’re not bringing in a professional yet, but you should be looking for any obvious issues, especially ones that could cost you a lot of money.
Focus on large-dollar problems, like structural concerns, roof condition, or major system failures. If you notice these during the showing, consider including them in your initial offer. For example, if you see the roof needs replacement as looking at it from the ground as you pull up to the property, you might offer less or request a credit for repairs upfront.
It’s important to act in good faith. If you saw the carpet was worn out before making your offer, it wouldn’t be reasonable to ask the seller to replace it during the inspection process. The goal of the inspection period is to catch things that weren't obvious during your initial walk-through or that affect the safety and functionality of the property.
Dates are Important
Dates in your real estate contract are important, especially those tied to your inspection and due diligence periods.
Missing a deadline can mean you lose important rights, including the ability to terminate the contract and get your earnest money back.
Make sure you understand the deadlines for all your due diligence tasks. You might have different dates for things like the physical inspection, getting a survey, or reviewing leases and tenant estoppel statements (for rental properties). It’s important to track each of these separately to avoid missing any.
Each contract is unique, so always read through your specific agreement to see what deadlines are included. You should know exactly what’s required and when.
As the buyer, your role is to make sure each task—like inspections, surveys, or reviewing documents—is completed by its deadline. It’s your responsibility to schedule the inspections, review the reports, and decide if any issues are worth objecting to.
Your real estate agent might help by keeping track of these deadlines, scheduling inspections, and coordinating with the seller's agent. They might also assist in reviewing documents and alerting you if anything needs immediate attention. However, you should still be proactive and double-check everything to protect yourself and your earnest money.
Your Right to Inspect per the Contract
Your right to inspect is outlined in your contract to buy and sell real estate. This gives you the opportunity to evaluate the property’s condition before fully committing to the purchase.
A typical contract might say:
"Buyer, acting in good faith, has the right to have inspections (by one or more third parties, personally or both) of the Property and Inclusions, at Buyer’s expense."
Let’s break that down.
Good Faith
You’re expected to act in good faith during the inspection process. This means you can’t use the inspection as an excuse to back out of the deal for unrelated reasons. If you simply change your mind about the purchase, you can’t claim inspection problems unless there’s a legitimate concern about the property’s condition.
The inspection can cover many issues that you can terminate based on, which we’ll cover below.
One or More Third Parties
You can bring in experts to help with your inspection. This could include general inspectors, electricians, plumbers, or contractors, depending on what’s needed. While you’re free to personally inspect the property, it’s a good idea to hire professionals to ensure a thorough review.
However, showing the property to prospective tenants under the guise of an inspection wouldn’t be considered acting in good faith. If you want to show the property before closing, you can ask for permission through an Additional Provisions section in your contract.
Property and Inclusions
Your inspection rights extend to both the property itself and any “inclusions.” Inclusions are items that come with the sale, like built-in appliances or fixtures. We’ll go into more detail about inclusions later, as they are usually outlined in a separate section of your contract.
At Buyer’s Expense
You, as the buyer, are responsible for paying for any inspections. This could range from a basic home inspection to specialized evaluations, depending on what’s needed.
By understanding and using your right to inspect, you can make sure the property is in the condition you expected when making your offer.
What Can You Inspect?
When you’re buying a property, your right to inspect typically covers five key areas.
Let’s start by breaking down the first two, then we’ll take a slight detour to talk more about inclusions before moving on to the remaining three.
1. The Physical Condition of the Property
This is what most people think of when they hear "inspection." It includes checking the condition of the roof, walls, and overall structural integrity of the property. You’ll also want to inspect the electrical systems, plumbing, HVAC, and other mechanical systems. These are all critical to making sure the property is safe and functional.
2. The Physical Condition of the Inclusions
Inclusions are items that are part of the sale, such as built-in kitchen appliances, light fixtures, or other features specifically mentioned in the contract. The condition of these items is also important to inspect, as they are part of what you’re buying.
You’ll often find a detailed list of inclusions in another section of your contract.
Inclusions
A typical contract usually has a section detailing what is included in the purchase price. This section outlines what items, known as “inclusions,” come with the property when you buy it.
A contract might say something like:
“The Purchase Price includes the following items (Inclusions):”
Let’s break this down into the types of inclusions you might find in your contract.
Attached Inclusions
In many contracts, attached inclusions are specifically listed. These are items physically attached to the property and included in the sale unless otherwise excluded.
For example it might say:
“If attached to the Property on the date of this Contract, the following items are included unless excluded under Exclusions: lighting, heating, plumbing, ventilating and air conditioning units, TV antennas, inside telephone, network and coaxial (cable) wiring and connecting blocks/jacks, plants, mirrors, floor coverings, intercom systems, built-in kitchen appliances, sprinkler systems and controls, built-in vacuum systems (including accessories), garage door openers (including ALL remote controls).”
Additional items like solar panels, water softeners, or security systems might also be listed as inclusions, especially if they are owned by the seller and not leased.
During your inspection, you’ll want to check all of these items. If they aren’t in working order or are missing, you can object as part of your inspection process.
Inclusions – Not Attached
Contracts might also include items that aren’t physically attached to the property but are still included in the sale.
For example, it might say:
“If on the Property, whether attached or not, on the date of this Contract, the following items are included unless excluded under Exclusions: storm windows, storm doors, window and porch shades, awnings, blinds, screens, window coverings and treatments, curtain rods, drapery rods, fireplace inserts, fireplace screens, fireplace grates, heating stoves, storage sheds, carbon monoxide alarms, smoke/fire detectors and all keys.”
These items are also subject to inspection. If something is missing or in poor condition, you can bring it up during the inspection period.
Other Inclusions
Some contracts may allow for additional inclusions that don’t fall under the standard categories. These are usually manually added by you and your real estate agent for things that you want to be included that are not part of the standard contract template.
A contract might state:
“The following items, whether fixtures or personal property, are also included in the Purchase Price:”
This could be where specific appliances are listed, such as:
“Currently Installed: Electric Range/Oven, Dishwasher, Refrigerator, Clothes Washer, Clothes Dryer, Microwave.”
If you added these to the contract then these items can also be inspected, and you can raise objections if they don’t meet your expectations or aren’t functioning properly.
Parking and Storage Facilities
Parking and storage facilities are sometimes listed as inclusions in your contract.
A contract might say:
“Use Only or Ownership of the following parking facilities: ____________; and Use Only or Ownership of the following storage facilities: ____________.”
As with the other inclusions, parking and storage facilities are part of what you can inspect and object to if they don’t meet the terms of your agreement.
Continuing: What Can You Inspect?
We already covered the first two areas you can inspect: the physical condition of the property and the inclusions. Now, let’s continue with the remaining three.
3. Services to the Property
A contract might say that you have the right to inspect the services provided to the property, which includes utilities and communication services. You’ll want to make sure essential systems like heating, plumbing/sewer, and electrical systems—both inside the property and those leading up to the property—are in good working order.
Beyond that, it’s important to verify that the utilities you need are available. For instance, if high-speed internet is critical for your tenants or yourself, you should confirm it’s available.
Water access and quality have also become increasingly important, especially in areas prone to shortages or restrictions.
If any of these services are missing or inadequate, you can raise an objection during the inspection period.
4. Proposed or Existing Transportation Projects
A typical contract might give you the right to investigate any nearby proposed or existing transportation projects. This includes roads, streets, or highways that could affect the property.
During your inspection period, check with local city, county, or state resources, as well as neighbors, if you're concerned about any upcoming infrastructure projects. For example, a planned highway expansion could bring unwanted traffic noise or change the neighborhood dynamics. If a transportation project could negatively impact the property, you can object.
5. Other Activity, Odor, or Noise
The contract might also allow you to inspect for any other activity, odor, or noise—whether on or off the property—that could affect it or its occupants. This is a broad and very buyer-friendly provision.
It means you can object to anything that might reduce the property's value or livability. For example, if you discover a factory nearby that produces strong odors or noise, this could be grounds for an objection.
The contract typically gives you the right to object based on “Buyer’s sole subjective discretion,” meaning the decision is entirely yours if something feels off.
Remember, you must submit any objections before the Inspection Objection Deadline to protect your earnest money. If you don't object in time, you may lose the right to raise these concerns later.
While there's no "I changed my mind" clause in the contract, it often provides buyers with considerable flexibility to terminate based on various unsatisfactory conditions, as long as they're acting in good faith.
Your Options
Once your inspection is complete, you have three options:
Accept the Property "As Is" – You proceed with the purchase without requesting any repairs or concessions.
Terminate – If the inspection reveals unacceptable issues, you can choose to back out of the deal.
Object – You can ask the seller to address specific problems by making repairs or offering financial concessions.
If you accept the property "as is," there’s nothing more to do related to the inspection, and the deal continues. We’ll cover more advanced strategies for accepting "as is" later when we discuss negotiating philosophies.
For now, let’s focus on the option to terminate.
You Can Terminate
If your inspection reveals something unacceptable, you have the option to terminate the contract.
This is typically done through a written notice, which a contract might refer to as a Notice to Terminate:
"Notify Seller in writing that this Contract is terminated."
To officially terminate, you’ll often need to submit two forms:
Notice to Terminate – This is a unilateral form, meaning you alone can decide to end the contract based on a specific ability to terminate in the contract. In this case, the inspection.
Earnest Money Release – This form requires both you and the seller to agree on how the earnest money will be distributed.
We’ll go over each form in more detail, but the main point to remember is that you don’t have to object to the property’s condition to terminate. If you find a legitimate issue during your inspection, you can simply decide not to proceed with the purchase.
You Can Object
If your inspection uncovers issues that you want the seller to address, you can file an Inspection Objection. A contract might say:
"Deliver to Seller a written description of any unsatisfactory physical condition that Buyer requires Seller to correct."
This objection allows you to formally request that the seller fix specific problems with the property. Once you file the objection, you enter a negotiation phase with the seller. The seller may agree to make repairs, offer concessions, or refuse to address the issues.
Here are your two options if the seller doesn’t agree to your requests:
Terminate – If you and the seller can’t come to an agreement by the Inspection Resolution Deadline, you can choose to terminate the contract.
Withdraw the Inspection Objection Notice – If you still want the property despite the seller not agreeing to your terms, you can withdraw the objection and proceed with the purchase "as is."
As the buyer, you must submit your objection by the Inspection Objection Deadline. If you miss this deadline, you waive your right to object or terminate based on the inspection.
We’ll go over a sample Inspection Objection Notice and how it works in more detail below.
You Can Resolve Your Objection
If you’ve submitted an objection based on your inspection, you and the seller will need to reach an agreement on how to address the issues.
This is outlined in a contract under something like Inspection Resolution:
"If an Inspection Objection is received by Seller, on or before the Inspection Objection Deadline, and if Buyer and Seller have not agreed in writing to a settlement thereof on or before the Inspection Resolution Deadline, this Contract will terminate on Inspection Resolution Deadline unless Seller receives Buyer’s written withdrawal of the Inspection Objection before such termination."
Here’s what this means for you:
If you and the seller don’t reach an agreement by the Inspection Resolution Deadline, the contract will automatically terminate.
IMPORTANT: If you still want to buy the property "as is" but haven’t reached a resolution, you must withdraw your Inspection Objection Notice before the Inspection Resolution Deadline to avoid the contract terminating.
Alternatively, if you and the seller agree to a solution before the deadline, you’ll formalize that agreement in writing using an Inspection Resolution form. This form outlines what repairs or concessions the seller will provide, allowing the transaction to continue.
We’ll cover the Inspection Resolution form in more detail below.
Parties Involved
Several key parties are involved in the inspection process, each playing a vital role in ensuring the property is properly evaluated before closing.
Buyer (and their Real Estate Agent) – As the buyer, you drive the inspection process. You hire inspectors, review reports, and decide whether to object, terminate, or accept the property. Your agent helps coordinate everything and keeps track of deadlines, but your real estate agent is not an inspector and is not trained to inspect properties.
Seller (and their Real Estate Agent) – The seller and their agent provide access to the property and respond to any inspection objections. They may agree to make repairs, offer concessions, or negotiate solutions. Some sellers may want to make repairs themselves or they may hire contractors to complete negotiated work; this is negotiated between you and the seller.
Inspector(s) – The inspectors are hired by you, the buyer, to thoroughly examine the property. They provide a detailed report on the condition of major systems like electrical, plumbing, HVAC, and structure.
Lender – If you’re financing the purchase, the lender must be informed about any material issues that could impact the value of the property. Serious problems discovered during the inspection could affect their willingness to loan you the money, as the property serves as collateral. Not disclosing issues could be considered loan fraud.
Insurance Agent – If you discover damage during the inspection (like hail damage to a roof), the seller’s insurance may be involved to cover the repairs. Your own insurance agent might also want to know about issues that could impact the insurability of the property, though this is less common.
Contractors – If any specific problems are identified during the inspection, you might need to bring in contractors for repair estimates and get additional information on the nature and severity of the issues. Sellers may hire contractors to fix issues you’ve negotiated.
Inspection Objection Notice
The Inspection Objection Notice is an important document in the inspection process. It allows you, as the buyer, to formally notify the seller of any issues you’ve uncovered and request repairs or concessions.
A typical notice might start with a statement like:
"THIS FORM HAS IMPORTANT LEGAL CONSEQUENCES AND THE PARTIES SHOULD CONSULT LEGAL AND TAX OR OTHER COUNSEL BEFORE SIGNING."
This is a good reminder that if you have any doubts or questions, you should seek legal advice.
It’s also important to note that this form is not an amendment to the contract. Any agreement reached after submitting the objection would be documented in a separate amendment to the contract in the form of an Inspection Resolution.
The objection notice usually includes details like:
"This Inspection Objection Notice relates to the contract dated ____________ between ____________ (Seller) and ____________ (Buyer), relating to the sale and purchase of the Property known as ____________."
The form allows you to outline your specific objections. You'll notify the seller of any unsatisfactory conditions with the property or inclusions, then provide a detailed list of items that need to be addressed. If you need more space, you can attach additional pages to your objection notice.
You Must Tell Your Lender
If you’re wondering whether you need to inform your lender about issues discovered during the inspection, the notice itself often includes a statement reminding you:
"Resolution of inspection items or other items agreed to by the parties may alter the terms of the Contract and require disclosure by Buyer to Buyer’s lender."
This note explains that resolving inspection items could affect your loan, and it encourages you to discuss these changes with your lender before finalizing any agreement.
Here’s why this matters:
Keep reading with a 7-day free trial
Subscribe to Real Estate Financial Planner™ to keep reading this post and get 7 days of free access to the full post archives.